Photobucket Photobucket Photobucket

Thursday, April 21, 2011

T-Shirt Flower with Necklace

I first want to take a moment to say how proud I am of my husband for sticking through school. It is hard to retire, but harder when it was a complete way of life {soldier} and an injury forces you to move on. But he felt God's calling on him, went back to finish up his degree {in Dec, but will walk in May}, now working on his master's... and then on Palm Sunday he was ORDAINED! I am so thankful to God for seeing us through and am praying for the right door to open up for him, for us, in a church and ministry where he will be called to pastor.
Moving on... Classes are wrapping up, here on my college campus, so I have been a little absentee on my blog for the past week... but I have still been trying NEW things to keep me sane! lol
I had recently made a couple t-shirt necklaces {the no sew way} and loved them... there are so many posts and videos out there {different ways to make them, etc}. All I needed was T-SHIRT {I got a lot of free ones on campus last semester that I hardly wore and the colors still looked new} and a pair of scissors {I used my B&D electric scissors}.
I cut them in STRIPS from one side to the other, so that the strip was fully attached to itself and I would NOT have to sew it. I cut them in various widths because that is just how I roll, but nothing more than 1 inch thick. And then holding them with my hands in each end, I STRETCHED them out so that each piece kinda rolled. It was a good stress reliever. {haha}


And you can totally wear it just like that, wrap it 2x like a cowl, or do like I did and dress it up with a t-shirt NO-SEW flower! I was feeling that I could at least dress up one.... So I went to researching various no-sew material flowers... where I stumbled across the HANNAH flower by Craft Snob. 

All I needed was that same old t-shirt, scissors {electric for me}, and my handy-dandy hot glue gun.

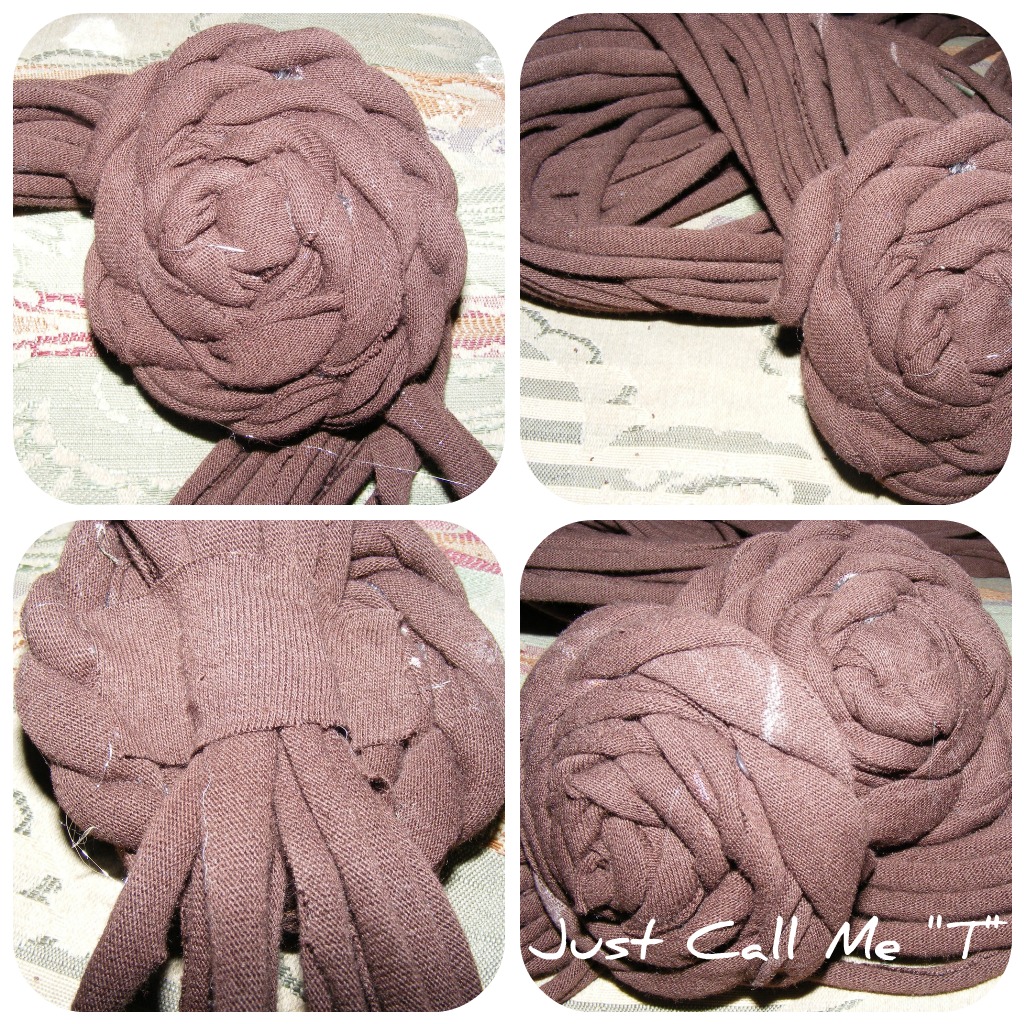
Basically I did just like I did with the t-shirt necklace; but... I made one strip about 3 inches thick. After I cut it is was fully attached, so I cut it to make it into a longer strip. I twisted it into one long strand and then I folded the TWISTED fabric in half and twisted again {not too tight now}. Then starting that the cut side of the twisted fabric I used the hot glue gun to keep my center in place and wrapped the material around itself, gluing as needed, until I was just out of material and then I glued on that last part with a little underneath {you can see Craft Snob's pic tutorial to get a better look}.

To attached to my T-SHIRT NECKLACE I just picked a spot on the necklace and grouped each strand together. I cut a "band-aide" type strip from the same t-shirt. Then I glued the flower on the necklace strands {I used my thumb underneath to make my flower have a curve, rather than lay flat}. And then, for the underneath, I just glued on my little strip and cut off any excess so that it had a finished look.

I even made a headband one with the same material AND have material left {of course it was a large t-shirt}. lol It was fun, super easy, and I want to make more after classes wrap up in TWO MORE WEEKS!!!!  {woot}

I loved making the FLOWERS, just to make them {hahaha}. More and more I am jumping on the flower craze... my next plan involves shoes. ;)


linked up...


Sunday, April 10, 2011

Pom-Pom Fun! {necklaces, hair clips, & head bands}

So this has been another crazy week, but at least I was able to get my CRAFT ON! I decided to try out Little Miss Momma's anthro-inspired pom-pom bib necklace {click her link for her tutorial--- that's how I did my first one, though I have some funky chains for my next few}...and then I just went POM-POM crazy!!


I started off with the pom-pom NECKLACE...


Then I decided to make some HAIR CLIPS. I made one for me, and then I made some for prizes {this Tuesday night I, along with two friends, are having a Sweet Treats Girls' Night Out on our campus... a baking party} and I thought I'd make the prizes. :)


And then I dolled up a plain white satin HEADBAND I had in my drawer {cannot wait to do my other ones, since they had just been sitting in there}. 

I also made a ribbon stretchy headband with a little left over material

These babies are super CUTE and easy to make!


All you need:
Felt {color that goes with your material}Fabric {I bought a few packages of pieces/ patterns from Hobby Lobby for $4}Scissors {I used reg and my electric B&D cutters}Hot Glue Gun & Glue SticksFor HAIR CLIPS: Metal Hair Clips {I used two different kind, one I covered with ribbon}For NECKLACE: Chain, Jewelry Clippers & PliersFor HEADBAND: Headband of your choice {if you buy a plain one, you can cover with ribbon... you can even use those stretchy headbands}


Click HERE for easy tut on making these fabric pom-poms.

Enjoy!


Friday, April 1, 2011

No Bake Oreo Cake Balls

So yesterday afternoon I thought it would be nice to make my son a treat {a little special pre-treat to him having his tubes put in this morning}. I wanted something fast, easy, and different...


I decided to go with NO-BAKE OREO CAKE BALLS. I've never made them before, so I looked around online for what I was to mix the crushed Oreo cookies with... I kept coming across real cream cheese as the "glue" {hmm}. 

So I decided to split the crushed cookies in HALF and use real cream cheese with one half and cream cheese frosting {just happened to have some store bought on hand}. 

this was with real cream cheese... the taste was ok but they look horrible!
Ok, so I will NEVER use real cream cheese in cake balls again. IMO it was too sticky, it did not round as well {and I used less than half the cream cheese}, and even after setting up in the fridge were not worth it after I coated a couple... So toss that and move onto the cream cheese FROSTING batch. 

Just coated them in chocolate almond BARK {add a smidge of shortening for shine}, using a fork to drain excess chocolate out, and then topped with different sprinkles. 


I LOVE THEM! 

They were the easiest cake balls I have made and by far LIL MAN's FAVORITE! 


Back to my lil man for some RANDOMNESS... His surgery went good today. The goofy juice had us cracking up as he wanted to "catch the running numbers" and then he cried b/c he thought when the nurse said "no driving" {meaning riding his bike today} that he couldn't go home as promised after... lol After the nurse "gave" his daddy permission to drive us home today, he was happy. ;) Still a little grumpy now, but the headache {hangover} has worn off and he has his land legs back. My baby can hear and will hopefully NOT get anymore ear infections! {as for me, ironically last night the urgent care center diagnosed me with my first ever ear infection... what is up with that?!}

my youngest lil man... his FAV blanket {passed down} and MY mama bear

Well, off to relax with the lil man... Happy Friday! 

{p.s. we postponed our practical jokes till we are sure lil man is up to the fun}