Photobucket Photobucket Photobucket

Sunday, June 26, 2011

Smores No-Bake Cake Balls


If you're like me, SUMMER is for swimming, grilling, and sitting around a campfire roasting marshmallows. But, if you're like me, you don't always have the luxury of a clear night to go to the lake with your family... So not wanting to miss out, we decided to have a few mock camp outs in the living room. 

The other night we made SMORES {using those cute square marshmallows}, electric candle light {safe for the lil man}, and marshmallow sticks... Marshmallow sticks? Yes- just alternated the square marshmallows with mini assorted flavored ones and stuck them on lollipop sticks for the kids to "roast". They looked cute on their picnic blanket {one of their dad's old Army blankets}, pretending to roast 'shmallows.


I was looking forward to making these. I looked around but found nothing that was no-bake for making SMORES BALLS and I even checked the two best *cake ballers* around {unless I was blinded from them by their other awesome goodness}.  But yeah,the only ones I found were using cake instead of graham crackers {which does not make it have a real Smores quality, at least in my opinion}... they are still good I am sure- but I wanted graham crackers!!! 

So I decided to do these just like I did with my Oreo No-Bake Cake Balls {see the link for the recipe}. Substitute GRAHAM CRACKERS for the Oreos {crushed} and mold your ball around a mini marshmallow. After you let it chill, dip it in your bark and sprinkle with crushed graham crackers. 


SO YUMMY and super cute! {oh and no messy chocolate goo on my carpet- ha}


Party At:

Friday, June 24, 2011

Hanna Flower Necklace


This is my second necklace using the, easy to make, HANNAH FLOWER. Last time I made them I used them with a simple t-shirt necklace {check it out when you get a moment}... 

I wanted to make something that with white {an old t-shirt} but I didn't want to do another pom-pom necklace just yet {I have other fabric for the next pom-pom necklace I am going to do}.

Anyways... I came up with the following, using some easy steps and added some "bling" to it with some pearls and magnetic beads. Took me about 30 minutes!


I  made the flowers just like I did in my OTHER post { when I made the t-shirt necklace}.
I cut the strips about 3 inches thick. After I cut it is was fully attached, so I cut it to make it into a longer strip.
Then I shortened the lengths depending on the size I was going for
{matching two strips up in pairs, to make 4 plus one larger one "the odd man out"}
After that, I twisted it into one long strand and then I folded the TWISTED fabric in half and twisted again
{not too tight, t-shirt material stretches}
.
Starting that the cut side of the twisted fabric I used the hot glue gun to keep my center in place and wrapped the material around itself, gluing as needed, until I was just out of material and then I glued on that last part with a little underneath.
After all the flowers I wanted were made
{in this case, 5}
I placed them on a piece of white felt
{match your fabric color}
and then when I was happy with it, I glued them in place...
START AT THE MIDDLE and work out but do NOT glue the top outer two flowers yet.
Measure the chain the length you want it, with the flower "bib" and cut. It will just go over your head, so no clasps needed
{but too short and it wont fit}.
Then glue the chain ends on the back, in the middle of the flower and then glue both onto the felt.
Now you want to cut off the extra felt, around your flowers, so that you cannot see it from the front.
After it is cut out, glue any spots that need to be secured
{like where the flowers touch- or it will be too wobbly}.
Using fabric glue
{or the glue gun & glue you just used}
 glue on any beads to the center of your flowers to give it an extra SPARKLE.

And there you have it! 


If you make one, or have something you made using the Hannah flower... please let me know!

~~~~~~~~~~~~~~~~~~~

Before I go, I thought I'd share this cute little teddy bear with a blanket that I drew. Drawing, when I have the time, relaxes me and stretches me in a good way. Inspired by my friend Di {of The Girl Creative}, when she told me she was pregnant... 


Well, have a great Friday and enjoy your weekend! We are off for another weekend adventure- last week St Louis  and went to the Saint Louis Zoo and to go up the Gateway Arch... this weekend Cincinnati to check out {revisit} the Cincy Museum


Party Time:

Thursday, June 23, 2011

Flip-Flops, Pom-Poms, and Flowers

Well, summer is here and so is FLIP-FLOP season {when did it ever REALLY end, anyways}. I am not a flip-flop person unless it has something cute about it, but I could not pass up a try and dressing up some $1 flip-flops I found at Wally World.

I have made several other cute things with fabric pom-poms, so why not try it for my tootsies?

Just gather your MATERIALS:
Fabric of choice
Felt to match
Pins (I used the pins I use to make a fabric brooch)
Scissors
Hot Glue Gun & Glue
and of course, FLIP -FLOPS!

For this one, I used the white flip flops and red and white fabric to match a SUMMER dress I bought. 


HOW - TO
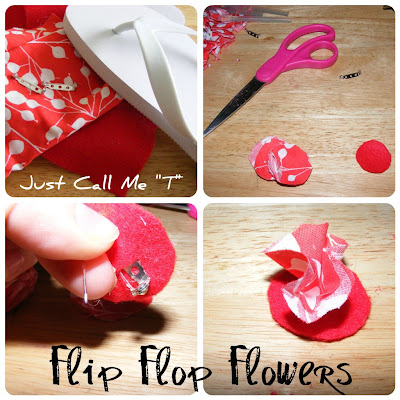
I cut out my felt in a circle, the size I wanted {x2}.
Then I cut out a bunch of fabric circles the same size, or just a little over sized {more over-sized if you want big pom-poms}. It is OK if the circles are not perfect.
Then I cut 2 slits in the felt {for the pin top to slide through} and glued the felt to the pin top.
Next, pinch your fabric circles, add hot glue to the tip and {starting at the center of the felt} add your scrunched fabric until it is as fluffy as you want.
Trim anything that looks out of place {to give it a rounded look}.
And pin it through your flip-flop middle!

*you can spray with scotch guard, if you want to water proof it*

I do not feel the the pin, the pin has not come out, my pom-poms are secure, and my $1 flip-flops look super CUTE!
What do you think? And what do you do to spruce up your flip-flops?

~~~~~~~~~~

On a different note, I am gardening now... FLOWERS that is. I'm not great at the ones already potted at the store, but I can grow a seed! {giggle} I also like to draw and have been drawing flowers here and there... here is a SUNFLOWER I drew {in the stages of progression}


If you're looking for more fun and easy POM-POM ideas you can do yourself...
check these pics out and then head over to my post on how I made them {click on the pics}!


Pom-Pom clips


My first made pom-pom necklace... love it!

And some headbands- one ribbon and leftovers... the other pure pom-pom fun!


THANK YOU for visiting and have a GREAT summer *flopping* around!